Be honest. You want that blue checkmark, don’t you? No matter the platform, getting verified is one of the best ways to establish credibility on social media. With social media filled to the brim with fake accounts and bots, it just makes sense that social media platforms let brand accounts get verified so users know they’re legit. In this article, we’re going to share the steps you can take to get verified on Facebook.
A couple of years ago, Facebook offered both blue and gray checkmarks as a way to signal the authenticity of smaller, local brands. They’ve done away with the gray checkmark, but the blue checkmark is still available to businesses on the platform who are interested in getting verified.
Does the blue checkmark really matter? Let’s take a look at why you should get verified on Facebook before diving into the requirements and how you can do it.
Your Step-by-Step Guide to Get Verified on Facebook:
Why Get Verified on Facebook?
What does it mean to get verified on Facebook? And why does it matter?


As we touched on earlier, brands, businesses, and public figures can easily run into copycats trying to imitate them. This doesn’t have to be for nefarious purposes, either. How many times have you been excited to see that some celebrity or another liked your online content only to find that it was actually a fan page and not the real deal? Even if the intent is good, there’s still a risk to you, your brand, and your online reputation if other users think they’re dealing with you and they aren’t.
When you get verified on Facebook and other social media platforms, it gives your official Page credibility and makes it less likely that other users will mistake you for an imposter.
Plus, Facebook gives priority to verified accounts and Pages in search results. This means that getting verified on Facebook could increase your reach by showing your official content at the top of the search results.
When other users see that you’re verified, they know that they can get customer service, shop, and engage with you and your brand without worry.
Facebook Verification Guidelines


Not just anyone can get verified on Facebook. There is a set of verification guidelines that your Page has to meet and follow to be eligible for verification. There are four verification guidelines that are particularly important, if highly subjective.
Authenticity
Your Facebook Page has to represent a registered business or entity, or a real public figure.
Completeness
Your Page or account has to have an active presence. This means a complete About section, profile and cover photos, and at least one post.
Notability
Your brand has to be a well-known brand, entity, or person. Facebook reviews accounts that get mentions online (and paid mentions don’t count).
Uniqueness
You can only have a single account for your brand or person unless you run multiple language-specific accounts. It’s important to note that “general interest” accounts don’t typically get that coveted blue checkmark.
If you’re verifying a Page or profile belonging to a law enforcement agency, elected official, politician, or city government, Facebook may have other requirements you have to meet before they hand over that blue checkmark.
These requirements are the very least Facebook expects and even if you meet all of the eligibility requirements, there’s no guarantee that Facebook will verify your account. The best you can do is take steps to make your account look as credible as possible. This means posting on Facebook regularly and often, as well as posting high-quality content that gets engagement from other Facebook users.
Let’s talk a little more about how you can best position yourself for easy verification on Facebook.
Laying the Groundwork for Verification


As we mentioned in the last section, you’ll need to make sure that your account is, and appears to be, credible. There are a few ways to do that.
Content
Create Facebook content that’s professional, engaging, and high-quality. Always include high-quality images or infographics and poll your followers or ask questions to spark engagement. Facebook also looks at independent media coverage, so look for opportunities to participate in events that get covered by TV, print, and web news sources.
You can also run Facebook ads to boost your posts, which will help with engagement.
Facebook Profile
Your Facebook profile needs to be complete and accurate. In your About section, you should include your website and make sure your profile is public so other Facebook users can follow you.
Facebook Page
Facebook Pages are incredibly versatile. You can include different types of information, depending on the category you choose when setting up your Page. With all of these options for information, it’s important to update everything regularly to ensure accuracy. At a minimum, you’ll want to include your website, business address and phone number, and a short bio. But, remember, the more complete your Facebook Page information, the more credible the Page looks.
How to Get Verified on Facebook, Step-by-Step
Getting verified on Facebook is free, but you’re still going to need to put in the effort to get your Page set up so Facebook hands over the checkmark. Before submitting a verification request, review your Page for accuracy and fill out your website, bio, email address, and business description. The goal is to include all the information possible so your Page screams “credible and legitimate!” at the Facebook verification gods.
All ready to go? Let’s do it!
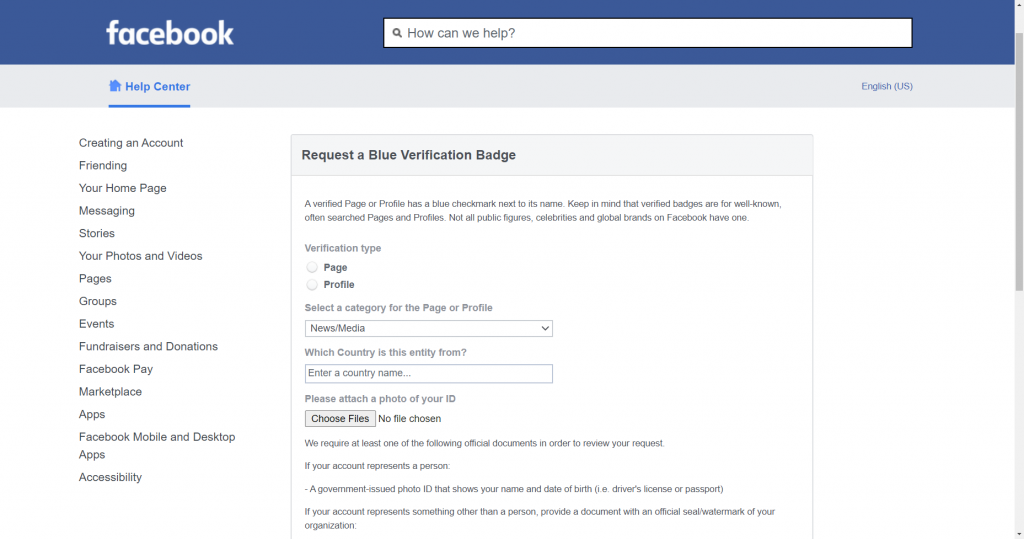
Step 1: Go to the Verification Request Page
Start the verification process on the Facebook Request a Blue Verification Badge page.
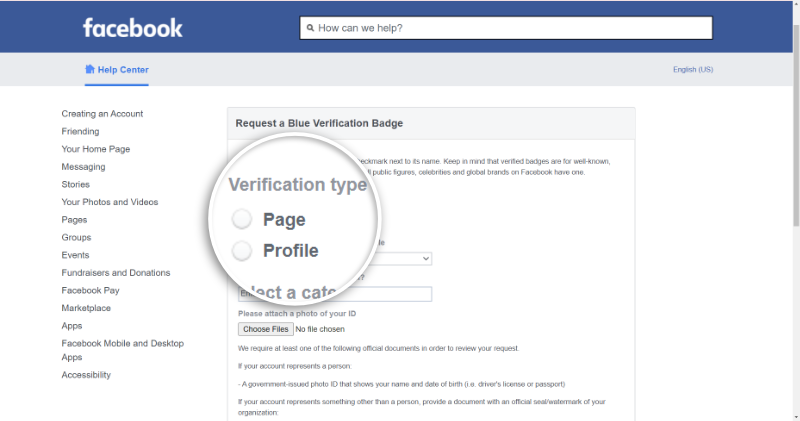
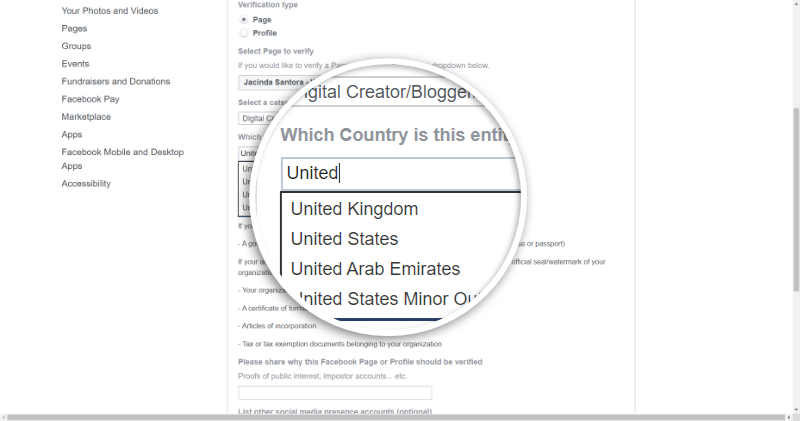
Step 2: Choose Your Verification Type
Choose your verification type. You can get a Page or your profile verified, but it’s important to note that the approval criteria is a bit more involved for profile verification. Either way, you need a lot of followers to prove that you’re blue checkmark material.
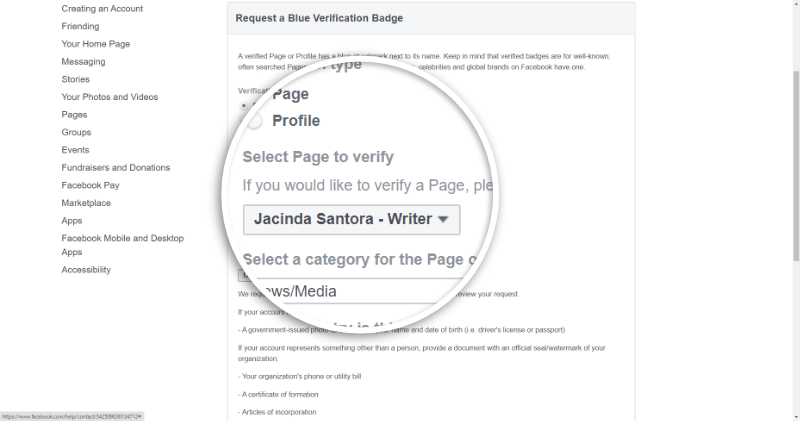
Step 3: Choose the Page or Profile to Verify
Now, choose the Page or profile you want to get verified on Facebook. If you’re requesting profile verification, you’ll provide your profile URL. For our example, we’ll say we want to verify a Page.
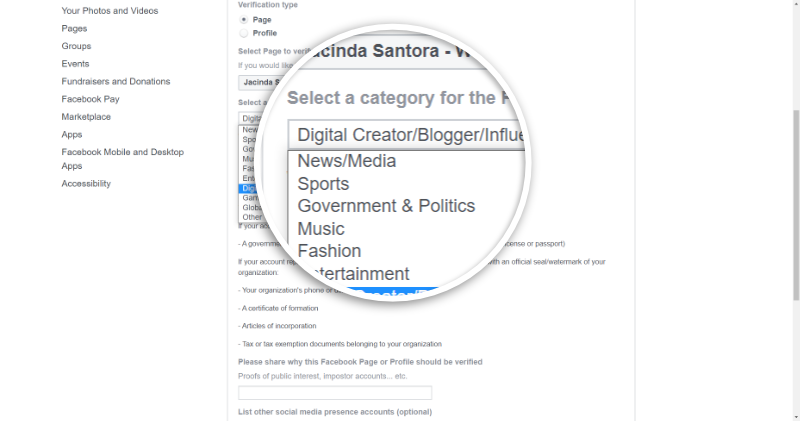
Step 4: Choose the Category for the Page or Profile
After choosing the Page or profile you want to verify, you’ll need to choose the category it belongs to. Facebook offers just a few categories to choose from. If you can’t find a category option relevant to your Page, just choose Other.
Step 5: Add Your Country
Next, you’ll need to add the country. Just start typing your country name in the field and you’ll get a list to choose from.
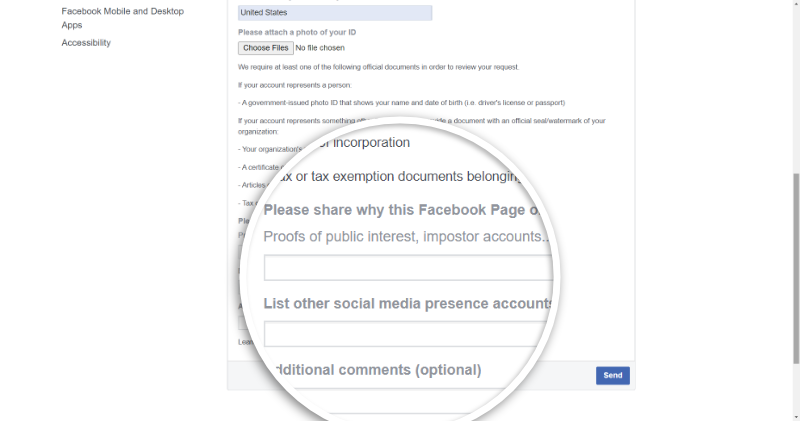
Step 6: Attach the Necessary Identification Material
This step varies depending on whether you’re trying to get a person verified on Facebook or if you’re interested in verifying a business. If the verification is for a person, Facebook requires that you upload an official photo ID that shows the name and birthdate of the person you’re verifying.
To verify a business, organization, or other non-person entity, you’ll need to provide documentation that includes an official seal or watermark of your organization. Facebook accepts:
- Your organization’s phone or utility bill
- A certificate of formation
- Articles of incorporation
- Tax or tax exemption documents belonging to your organization
Step 7: Detail Why You Want Verification
The next step to getting verified on Facebook is letting Facebook know why your Page or profile should be verified. If you have a particularly notable account, verification might be of public interest. In this case, you’d share mentions from reputable news outlets. Or, maybe your Page or profile is at risk because of imposter accounts. In this case, you’d want to include links to prove that you’re at risk.
Facebook also gives you the option to include your other social media accounts so you can show that you have a large enough following to warrant verification.
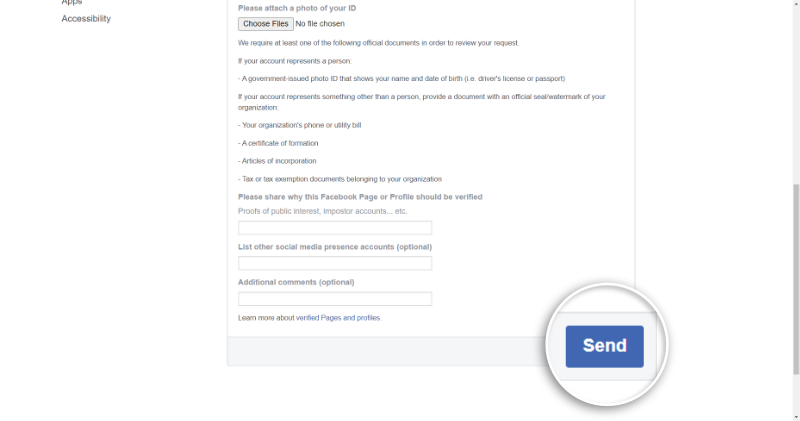
Step 8: Submit the Form
That’s it! Once you’ve filled out the form and attached the appropriate documentation, it’s time to submit your verification request by clicking Send in the lower right corner of the screen.
Step 9: Wait
Now that you’ve submitted your request for Facebook verification, all you can do is wait. Facebook doesn’t guarantee a response time—it could be anywhere from 48 hours to 45 days. If you’re trying to get a business account verified on Facebook, expect it to take longer since Facebook will need to manually review the documents you submitted for authenticity.
Facebook Rejected My Verification Request—Now What?
So, you tried to get verified on Facebook and they said no. It might just mean that you need to improve your Page or profile and submit another verification request. Go back to the Laying the Groundwork section of this article and make sure that you’ve done everything you can to create a credible account.
Make sure you’ve included as much information as possible to boost your credibility. If you’re a published writer, you can add publications to the Impressum section. Plus, work to get more mentions, reviews, and other types of social proof from other users and Pages, too. If you have a great Page or profile, you can always reach out to Facebook for more information about your verification rejection.
If you’ve been rejected, you can reapply for verification after 30 days. During that time, it’s important to put in work to improve your Page or profile and your online presence so you have a better chance of getting verified the next time. This means creating more high-quality content, keeping a regular posting schedule, boosting your Facebook marketing efforts, and working to boost your online presence on other social media platforms, too.
4 Key Tips to Get Verified on Facebook
We’ve covered a lot of information in this article that will help you get verified on Facebook. Before we wrap up, here are four tips to put into practice that will not only help you get verified on Facebook but will make your Page or profile stand out.


1. Keep It Professional
You want Facebook to know that your Page is associated with your business, so your account should reflect that. Take a look at your Page as though you were a potential customer and get rid of anything that makes you look unprofessional or negatively affects your Page’s credibility:
- Off-brand images or logos
- Low-quality images
- Personal posts
- Grammar and spelling errors
- Content that doesn’t fit your brand voice
2. Keep Your Information Up to Date
Facebook reviews and validates your information before giving you a blue checkmark, so you need to make sure that your information is up to date. This is also helpful for customers and potential customers. It’s incredibly frustrating to click the website on a Facebook Page only to find that the website doesn’t exist anymore. Even worse, an incorrect address for a brick-and-mortar business. Regularly review this information for accuracy:
- Website
- Email address
- Bio
- Description
- Address (especially if you have a physical location)
3. Link to Your Other Online Properties
To keep Facebook happy, you’ll want to include a link to your official website on your Page or profile as well as a link back to your Facebook Page from your website. This is also helpful in driving Facebook traffic to your website (and vice versa).
4. Provide Details
Don’t shy away from details. Fill out every single part of your Page, and include these details in your Page’s About section:
- Contact information (addresses, phone numbers, email addresses)
- Your mission statement
- A company overview
- Other social media profiles
Boost Credibility—Get Verified on Facebook
If you want to get your Page verified by Facebook you’ll need to put in the work to make your online presence as strong as you can. Ironically, getting verified on Facebook and other social media platforms goes a long way toward further strengthening your online presence. When you’ve taken the steps to get your Page or profile verified, it shows customers and potential customers that your brand is credible and legitimate. Plus, the blue checkmark lets them know that they’ve come to the right place.
Getting your Page or profile verified on Facebook is an easy process, so follow the steps above and get verified on Facebook now!



لا تعليق